Live Text Templates, Effects Masking and Tracking, DCP Export, and More
The 2014 update to Premiere Pro CC is not as comprehensive an overhaul as the one that greeted users of the CS6 version, with its welcome streamlining of the once-cluttered interface along with slick enhancements like improved trimming and hover scrubbing. But it has a nice array of new features that address efficiency in workflow, allowing editors to get more done in Premiere without going through redundant motions to apply and re-apply a given effect, or ducking out of Premiere entirely to fire up After Effects just to make small changes to type.
Premiere Pro CC
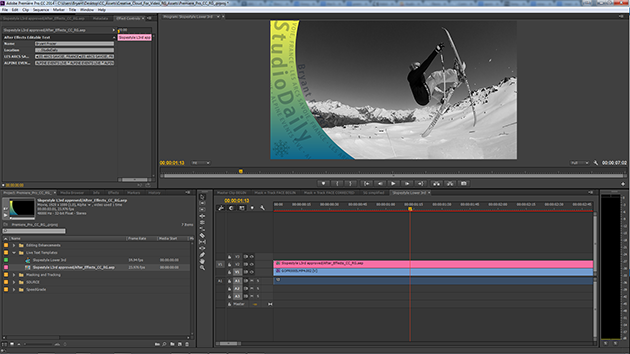
The new Live Text templates, which give Premiere Pro editors a simple interface for editing After Effects text layers, are designed to allow easy access to certain text fields (like a caption denoting the name of the person currently appearing on screen) while locking down others (more general information about events and locations that isn't likely to change during a single program). The editor gets at the text fields by opening a dynamically-linked AE composition from the Projects Panel in Premiere's Source Monitor. The Effect Controls panel will display a series of text fields for each editable element. The text updates immediately in Premiere, so you can check for overflow or other formatting issues and scrub through any animation to make sure everything still looks good. However, there are no advanced text tools like font, size, or kerning. If you need that fine level of control, you'll need to hop back into AE, at least for now. But for many applications, the one-size-fits-all approach should streamline workflow considerably between editorial and graphics.
If the feature has been enabled in the original After Effects composition, text layers can be edited in the Effect Controls panel without leaving Premiere.
Naturally, the option has to be enabled in the After Effects composition for the text layers to be editable in Premiere. You do this by going into the Advanced tab of AE's Composition Settings and checking the option labeled Template (unlocked text layers editable in Premiere Pro). And if you do need to make formatting changes in After Effects — like changing the font or increasing the size — they will be reflected immediately in a dynamically linked Premiere Pro sequence.
A mask can easily be applied to effects in Premiere Pro, and buttons in the Effect Controls panel enable automated tracking on a full clip or frame-by-frame basis. If the track goes astray, you can adjust it manually right in Premiere, or send it to After Effects for refinement.
Effect masking and trasking is another welcome transfer of functionality from AE to Premiere. When you apply an effect to a clip on the timeline, you now have the option of choosing an elliptical or four-point polygon mask for that effect, constraining the effect to a user-defined area of the picture. For example, you could apply a blur or mosaic to obscure a face or logo that isn't cleared to appear in your project. So far, so good. The game-changer for Premiere is the addition of tracking buttons to the mask effect. You can hit a play button to have Premiere calculate the track over time by analyzing the footage underneath the mask, or you can move through frame-by-frame to keep a closer eye on the track. If the track goes astray, you can simply click and drag the mask to correct it, but this feature seems to do a reasonably good job on its own, depending on the content of the clip and exactly where you initially draw the mask. These masks are available for further refinement if the project is roundtripped to AE, but the addition of simple automated tracking gives Premiere editors a powerful new tool inside the NLE.
Premiere Pro's Master Clip effects will be an impressive shortcut when you need to apply a specific look to every instance of a given clip in your sequence — say each appearance of a clip recorded with a cheap GoPro that you're intercutting with higher-quality footage from other cameras. You need to select an instance of that clip in your sequence and open the master clip in your source panel — not by double-clicking but by hitting the F key to invoke the Match Frame function. Once you do that, you can apply effects to the Master Clip that will be reflected everywhere a subclip from that clip appears in your sequence.
New expanded native format support includes ARRI Amira, Sony SStP and the Blackmagic Pocket Cinema Camera's CinemaDNG. As you'd expect, settings for the raw media are available by looking at the clip in your bin, right-clicking, choosing Source Settings to bring up the interface with color settings, white balance, etc. Red users will be happy to see that GPU debayering of Red media has been added, which should speed things up considerably on many systems. Maybe you won't need that Red Rocket card anymore.
Another format new to Premiere Pro and Adobe Media Encoder is DCP, courtesy of AME's new integration of the QuVis Wraptor DCP encoder. You can export a 2K DCP right from the Premiere timeline. You just export the sequence the same way you would to export it in any other format, selecting "Wraptor DCP" from the format menu. (Since the formats are listed alphabetically, this is at the bottom of the list; it would be more intuitive if it were just "DCP.") Options are pretty limited right now, but you can select your video dimensions, choosing from Full (2048×1080), Scope (2048×858), or Flat (1998×1080) depending on your project's aspect ratio. If you need 4K or stereo 3D DCPs, you can purchase separate modules from QuVis that will also work within Adobe Media Encoder.
A 2K DCP can be exported from the Premiere timeline through Adobe Media Encoder. If you want 4K or stereo 3D, QuVis will be selling add-on modules.
SpeedGrade CC
Adobe continues to take small steps toward integrating SpeedGrade with the rest of its video applications, and the software does look a little more like its CC brethren with each release. This time around, Adobe has introduced a basic roundtrip between Premiere Pro and SpeedGrade. It's not fancy, but it does offer an easy way for Premiere editors to take advantage of SpeedGrade looks without taking a deep dive into the software's feature set. To invoke it, you highlight a sequence in your Premiere Pro project bin and then pull down Direct Link to Adobe SpeedGrade from the File menu. (It would be easier and more intuitive if this were a right-click context-menu option.) Premiere Pro closes your project and SpeedGrade fires up on your desktop with the same project open and each clip available on the timeline. Apply a look to one or more clips in SpeedGrade, then click the button labeled "Direct Link to Adobe Premiere Pro" (it's right next to the save-as button) and SpeedGrade saves the project, which re-opens in Premiere Pro. If you check your Effect Controls panel, you'll see the new look is contained on a Lumetri effect layer. You can switch that effect on and off if you need to, or even constrain and control it via Premiere's new masking and tracking tools. (That could be a relatively simple way to get some fairly complex color-correction effects.)

SpeedGrade's Master Clip functionality is enabled by clicking the big friendly button at the top of the Look panel.
By default, SpeedGrade applies looks only to individual subclips, not to every instance of that clip on the timeline. Fortunately, using the Master Clip feature in SpeedGrade is pretty easy — just select a clip that appears multiple times in the sequence and choose Master Clip mode by selecting the appropriate, clearly labeled button at the top of the Look panel. It works exactly how you'd expect. Apply a look to that clip, and the change is carried over to every appearance subclips from that clip make in your sequence. It's a great way to apply LUTs, especially in sequences with lots of intercutting between different styles of footage.
After Effects CC
In After Effects, the chromakey tool has gotten some new options that seem to work well for a lot of challenging green-screen tasks, like isolating hair or pulling a good key with partially transparent surfaces. The new effects, Key Cleaner and Advanced Spill Suppressor, can be used alongside Keylight or third-party keying tools. AE comes with a preset called Keylight + Key Cleaner + Advanced Spill Suppressor that gives you the usual array of Keylight options, but with the ability to switch Key Cleaner and Advanced Spill Suppressor on and off to see if they yield better results. Each new tool has a small variety of adjustable settings to help dial in a key precisely.

It really is a pleasure to use some of the more esoteric keying parameters in After Effects CC to get that green screen dialed out just the way you like it.
Prelude CC
Finally, Prelude has gotten some nice new capabilities, such as the ability to assemble a rough cut. You select the clips or subclips that you want to include in your sequence, in order, and then use the Create Rough Cut feature to display it on the timeline, where the clips can be trimmed and reordered. The process for making various annotations has gotten slicker, too, There's a new comment-marker feature that allows temporal comments to be added to footage with a few keystrokes, and tagging gets easier with a new Tag Template feature that lets you customize a simple pushbutton-style interface panel for adding tagged and color-coded markers to footage without typing.
Crafts: Editing Post/Finishing VFX/Animation
Sections: Technology
Topics: adobe adobe media encoder After Effects creative cloud prelude premiere pro SpeedGrade
Did you enjoy this article? Sign up to receive the StudioDaily Fix eletter containing the latest stories, including news, videos, interviews, reviews and more.


Hi !
Which version of SpeedGrade is needed for Master Clip function ?
I just see “Layout” button, is that because the sequence is directlinked to premiere pro ?
Thanks for your answer, and for your article ! 🙂
It’s in the new version, CC 2014. Not sure where you’re seeing the Layout button. I see the Master Clip button whether I open a clip directly or direct-link it from Premiere Pro. Select the Color tab at the top of the interface and you should see it available in the “Look” panel at the bottom left.
Oh ok ! That’s because I don’t run the CC 2014 version, which corresponds to the 8.0 Speedgrade version !
7.2.1 doesn’t have this feature !
I will try the demo version from Adobe website !
I can’t wait to see that Master Clip functionnality in action ! 😀
Thanks !
The article writes about the new keying features in AE. What are the other new features in AE CC?
The new AE doesn’t have a ton of new features. In Addition to the keying effects and the live text templates (for use in Premiere Pro), there is now the ability to add multiple masked effects in a single layer, rather than stacking up additional layers to control the different effects. Again, the multiple masks can be moved back and forth between AE and PP.
Kuler has been integrated so that you can grab colors from elsewhere and use them as color themes for AE compositions. There’s Typekit integration, too.
Mercury Transmit allows you to see full-screen previews on an external monitor. There are some updates to the media browser, and a new panel-integration system that should let third-party developers make better use of the AE workspace.
Adobe has a good, detailed overview of the new stuff here: http://blogs.adobe.com/aftereffects/2014/04/new-changed-after-effects-cc-2014.html