One very under utilized feature in both Avid Media Composer and Apple Final Cut Pro is the software’s ability to assign an auxiliary timecode to clips. An auxiliary timecode is basically a fake, user-assignable timecode track that can be set to any timecode the editor desires.
 Why would you ever want to use an auxiliary timecode when chances are your clips already have a master timecode track? There are two very common uses. One is in a situation where you have multiple takes that all reference one specific range of timecode, like a music video performance where the playback used during the shoot is fed to a timecode slate for syncing. The playback drives the timecode slate with specific timecode that matches the audio master so no matter where in the song the artist begins to perform, the last chorus for example, the camera operator shoots the slate (hopefully in focus and properly exposed where the editor can make out the running timecode) and the editor always has a starting timecode reference for each performance. Another great use is when you have a multicam shoot that does not have cameras that are jam synced. All the cameras are shooting the same thing so after manually syncing you can then assign each camera an auxiliary timecode and group/multipclip the cameras into one clip. Another multicamera related usage (and one of my favorites) can be a savior when you encounter a rogue camera operator on a concert shoot, usually the handheld camera, who constantly starts and stops his camera as he roams around during the show. You can’t multiclip this camera into a group via an IN point since there are many different clips in the timeline for this single camera. Auxiliary timecode to the rescue.
 SITUATION 1: Auxiliary Timecode for Music Videos with Final Cut Pro
STEP 1: Using Sync Maps
To understand how to use and assign auxiliary timecode to a multicamera shoot it is helpful to build a sync-map for all of your cameras. A sync map is a multilayer timeline with all of your clips on their own video layer in sync with a piece of audio. It can be as simple as two layers for syncing two cameras or as complex as the 98 take music video sync map below that I broke up into two timelines. This particular project was a music video with a timecode slate. That timecode on the timecode slate corresponds to the timecode of the audio which was created from an audio master. You can change the timecode of the edit sequence to match the audio track and that will give you the same timecode in your sequence that matches that timecode on the slate. That will be the timecode that you assign to an auxiliary timecode track. If you look at sync map 01 you can see that you can almost multiclip all of the 44 angles with an IN point as nearly every shot has a common sync point at the timecode of the playhead, 01:01:36:06. Every shot except for video layers 33 and 42 have a common frame at 01:01:36:06. Since these two shots won’t group with an IN point we must use an auxiliary timecode. This timecode will be the timecode on the slate at the top of each of your clips.
Sync map 01:

The takes in sync map 02 are even more disjointed with the director doing multiple takes of a chorus, the bridge and ending of the song multiple times without shooting the rest of the song. But since he always shot the timecode slate that was running the audio master timecode of the song then assigning that timecode on the slate to each of these clips will give proper timecode to sync.
Sync Map 2

STEP 2: Modifying timcode
For this music video example we will look at how to set this timecode in Final Cut Pro. Once you have your sequence set up with the audio master the way I like to assign an aux timecode is to set it after you sync each clip in the sync map. On a music video with timecode slates it’s easy. If you match frame from the timeline to the Viewer a synced clip from your sync map that sits on a clear frame of the timecode slate (clear in that you can clearly read the timecode numbers) you can then Modify > Timecode from the current frame in the Viewer window and set that current frame to the timecode on the slate:

Final Cut Pro gives you a clever Modify Timecode dialog box where you can pick the Frame To Set. You then check Aux TC 1 and type in the number on the slate to match and choose the correct format and frame rate. You have an option at the top of the Modify Timecode dialog box called Frame To Set. That can be set to either Current or First frame depending on what frame you want that particular aux timecode number assigned to. In this particular music video example you could just leave the option on Current since you are matchframing out of the timeline on a specific frame where you can clearly read the timecode on the slate.
The Modify Timecode box in FCP is a particularly powerful and dangerous place since you can also change source reel numbers and source timecode. Once you have assigned an aux timecode for each of your takes you can then group, or multiclip (same thing, different application), all the takes into one group or multiclip. You do this by selecting all the clips to which you have assigned the aux timecode and select Modify > Make Multiclip. FCP gives you a nice dialog box where you select the parameter to use to make the multiclip and it allows you to see the alignment of all the clips, as well as deselect a clip you might decide to exclude.
The Final Cut Pro Make Multiclip dialog box

STEP 3: Assign the proper auxiliary code
After this action you will have a new multiclip in your Browser with all of your takes in proper sync to the audio in the timeline. Edit the multiclip into the timeline at the same timecode of your new auxiliary timecode assigned in the multiclip and everything will be in sync. It’s inevitable that you will make a mistake in assigning the proper aux code from time to time so it’s best to quickly check the sync once you edit the newly created multiclip into the timeline by stepping through all of the takes. You can then either use FCP’s multicamera slipping techniques to slip or slide a take within the multiclip or make the proper adjustments and re-create the multiclip.
SITUATION 2: Using Auxillary Timecode to Fix Sync in a Multicam Shoot in Avid
STEP 1: Identifying sync issue
Let’s look at another scenario where this technique can come in handy. Say you have a live mulit-camera shoot where most all of the cameras are professional, high-end units and they are able to be jammed sync with the same timecode. That makes a multicam edit easy since all of the timecode is exactly the same as the cameras are all taking a timecode input from an external source. I said most because often you might have one (or more) consumer or prosumer cameras recording as well. One of those cameras might be a handheld where the shooter wanders the venue getting unique and cool angles. Usually this camera operator is informed to let the camera run for the entire event, even if you have to go to the bathroom. Don’t turn it off when moving from spot A to spot B to spot C etc. The reason for this is obvious; The less the camera is turned off the less you have to sync the camera by eye. It’s really not a big deal if they turn the camera off a time or two, especially if it is recording live audio as a reference, but if the operator repeatedly turns the camera on and off it can turn into a syncing nightmare. There is no way to sync all the cameras using a common IN or OUT point. When that happens you are often left with a timeline might resemble this:

STEP 2: Use Auxiliary timecode to sync all takes
As I said there is obviously no way to sync all of these cameras by an IN or OUT point since the moving camera on V6 has 55 separate clips! You can’t use source timecode since the handheld cam on V6 wasn’t getting the master timecode feed. But you can use auxiliary timecode. What differs in this multicam shoot scenario from the music video example above is that you don’t have a slate that was getting a master timecode that all the shots reference. But what you do have is a master timecode on the rest of the cameras. That leaves only the handheld that really needs help. The key here is to assign a master timecode to your sequence that matches the timecode of the synced cameras. In this example the shoot was using time-of-day code so we assign a master timecode to the sequence of 19:14:14:00. This now becomes an auxiliary timecode of all of the cameras. The aux TC1 that we assign to the cameras 1 – 6 will exactly match their source timecode since they were jam synced but the handheld camera 6 has a 01:00:00:00 master timecode so when we assign camera 6’s aux timecode it will be a 19 hour code that matches the master code from the shoot. We know what this master code is since we synced all the takes in V6 as seen above and we assigned the master 19 hour timecode to our Avid timeline.
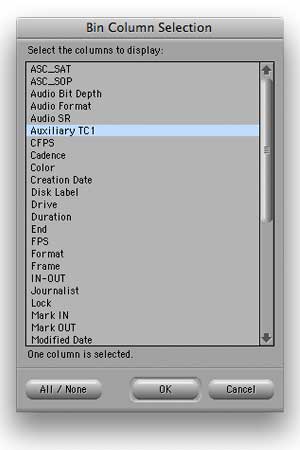
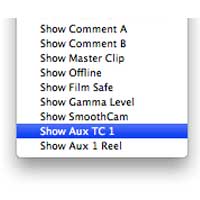
Assigning the aux timecode is a bit of a different process in Avid. First you need to set up a column layout in a bin with the Auxiliary timecode 1 heading (Accessed via the bin “hamburger” menu in the bottom left corner > Headings):

Then it’s as easy as a matchframe and find bin command away. For the above example I subclipped all of the shots from the handheld camera 6 so the first frame of each shot was a good frame and then edited those in sync in the sync map timeline. From the timeline, match frame the first frame of the clip to the source monitor, use the find bin command to locate the clip in the bin (make sure the aux timecode column is visible), and then assign an aux code to the clip that matches the master sequence timecode of the sync map.
In Avid it’s important to be sure you subclip these takes since you need to edit the first frame of each of the subclips into the sync map since when you match frame > find bin back to that subclip and add the Auxiliary timecode it will assign that code to the first frame of that subclip. It can be a bit tricky depending on what type of camera was used.
With a P2 based camera like the Panasonice HVX200 you will have a new master clip each time the camera paused so you can make a subclip with a good first frame from each take if the first frames of the master clip isn’t good. Then once they are edited in you can just step to each clip in the timeline, match frame > find bin and then assign the aux code. If the shooter was using a tape-based camera that was set to record run timecode (as in the above example) then you will have continuous timecode on the tape which is a bit more work. Since there is no obvious break point when the camera was paused you have to search through the clip manually and then subclip each and every take.
This, of course, can take some time and make the editor curse the camera operator who was instructed not to pause the camera during the shoot. Once you have subclipped each and every take then those subclips are edited into the timeline (or however you want to approach it). The key is to get all of those takes into the sync map so you can see where they fall in the master sequence sync map so you know what aux code to give them. Then when you match frame those clips in Avid you will be taken to the subclip via the find bin command and you can assign the aux code to the subclip. Once that is done you then select all of your clips in the bin and choose Bin > Group Clips > group via Auxiliary TC1:

Now you have a new grouped clip in your bin ready to edit into the timeline as one single clip.
Scott Says Keep in Mind…
I mentioned the different process “in Avid” a few sentences ago as this scenario highlights one of the big differences in Avid Media Composer and Final Cut Pro when it comes to grouping clips for multicam editing. In FCP, when you create multiple subclips from a single master clip changing the auxiliary timecode on a subclip will ripple that aux timecode change through all the subclips created from the same master clip. This can be a big problem if your roving camera with 55 different clips was from a tape based camera with record run timecode. In that case you would have to capture each individual piece as a seperate master clip and that can be a pain depending on your tape deck. The same is true for a music video in Final Cut Pro where you have to capture each take individually.
One question that many may ask is “why would I want to go through all this trouble to make a mulitclip when I could just stack the clips up as in the sync map and cut away what I don’t want to use?” That’s entirely possible but doing that in the FCP example would leave you with what could be a 98 layer timeline that, of course, would not be a usable edit timeline IMHO. Once you have used the properly set-up multicam / multiclip / group clip edit then you will see the ease and elegance of a much more properly managed timeline. I still use a number of video layers in an edit like this as I move takes around and grab different things from different parts of a song but a proper multigroup clip saves a lot of timeline headache and timeline madness. Plus you can use multicam editing tools like quad, nine, or sixteen-splits with realtime playback and camera switching. These tools are an essential part of multicam editing.
This is just one technique for using auxiliary timecode on a music video or multicamera concert. Check out this post on View From the Cutting Room Floor for their method. With a little practice you’ll be on your way to using auxiliary timecode to make a better multicam edit and you’ll find techniques and shortcuts of your own.
Did you enjoy this article? Sign up to receive the StudioDaily Fix eletter containing the latest stories, including news, videos, interviews, reviews and more.


Leave a Reply