If you do live event production and/or streaming, there is a good chance you will need a video switcher. Over the years I’ve reviewed a number of them from Blackmagic Design, who was the first to bring to market a sub-$1,000 HD video switcher with their ATEM Television Studio model a few years ago (the more recent ATEM HD Studio Pro was reviewed here). Shortly thereafter, Datavideo Technologies and Roland also started putting out switchers in that price range. This year, South Korean company Lumantek introduced its new ez-Pro VS4 four-channel switcher with some incredible features for the price point.
A number of features differentiate the ez-Pro VS4 from its competition, aside from its being an inexpensive HD switcher in a console form factor with actual buttons to push. What most attracted me to this unit is that each of the four input channels has a built-in scaler. In all of the video switchers I’ve reviewed in the last few years, the standard way to set up was to select the output of the switcher — most often 1080i in my case — and then get cameras that all put out the same resolution. That is not difficult, but connecting computers, especially MacBooks, proved time-consuming. Not all graphics cards want to put out 1080i, and when they do, some of them crop or underscan the picture. With the ez-Pro VS4, that is no longer an issue.

The LCD display is small, but it keeps you clued in.
Marc Franklin
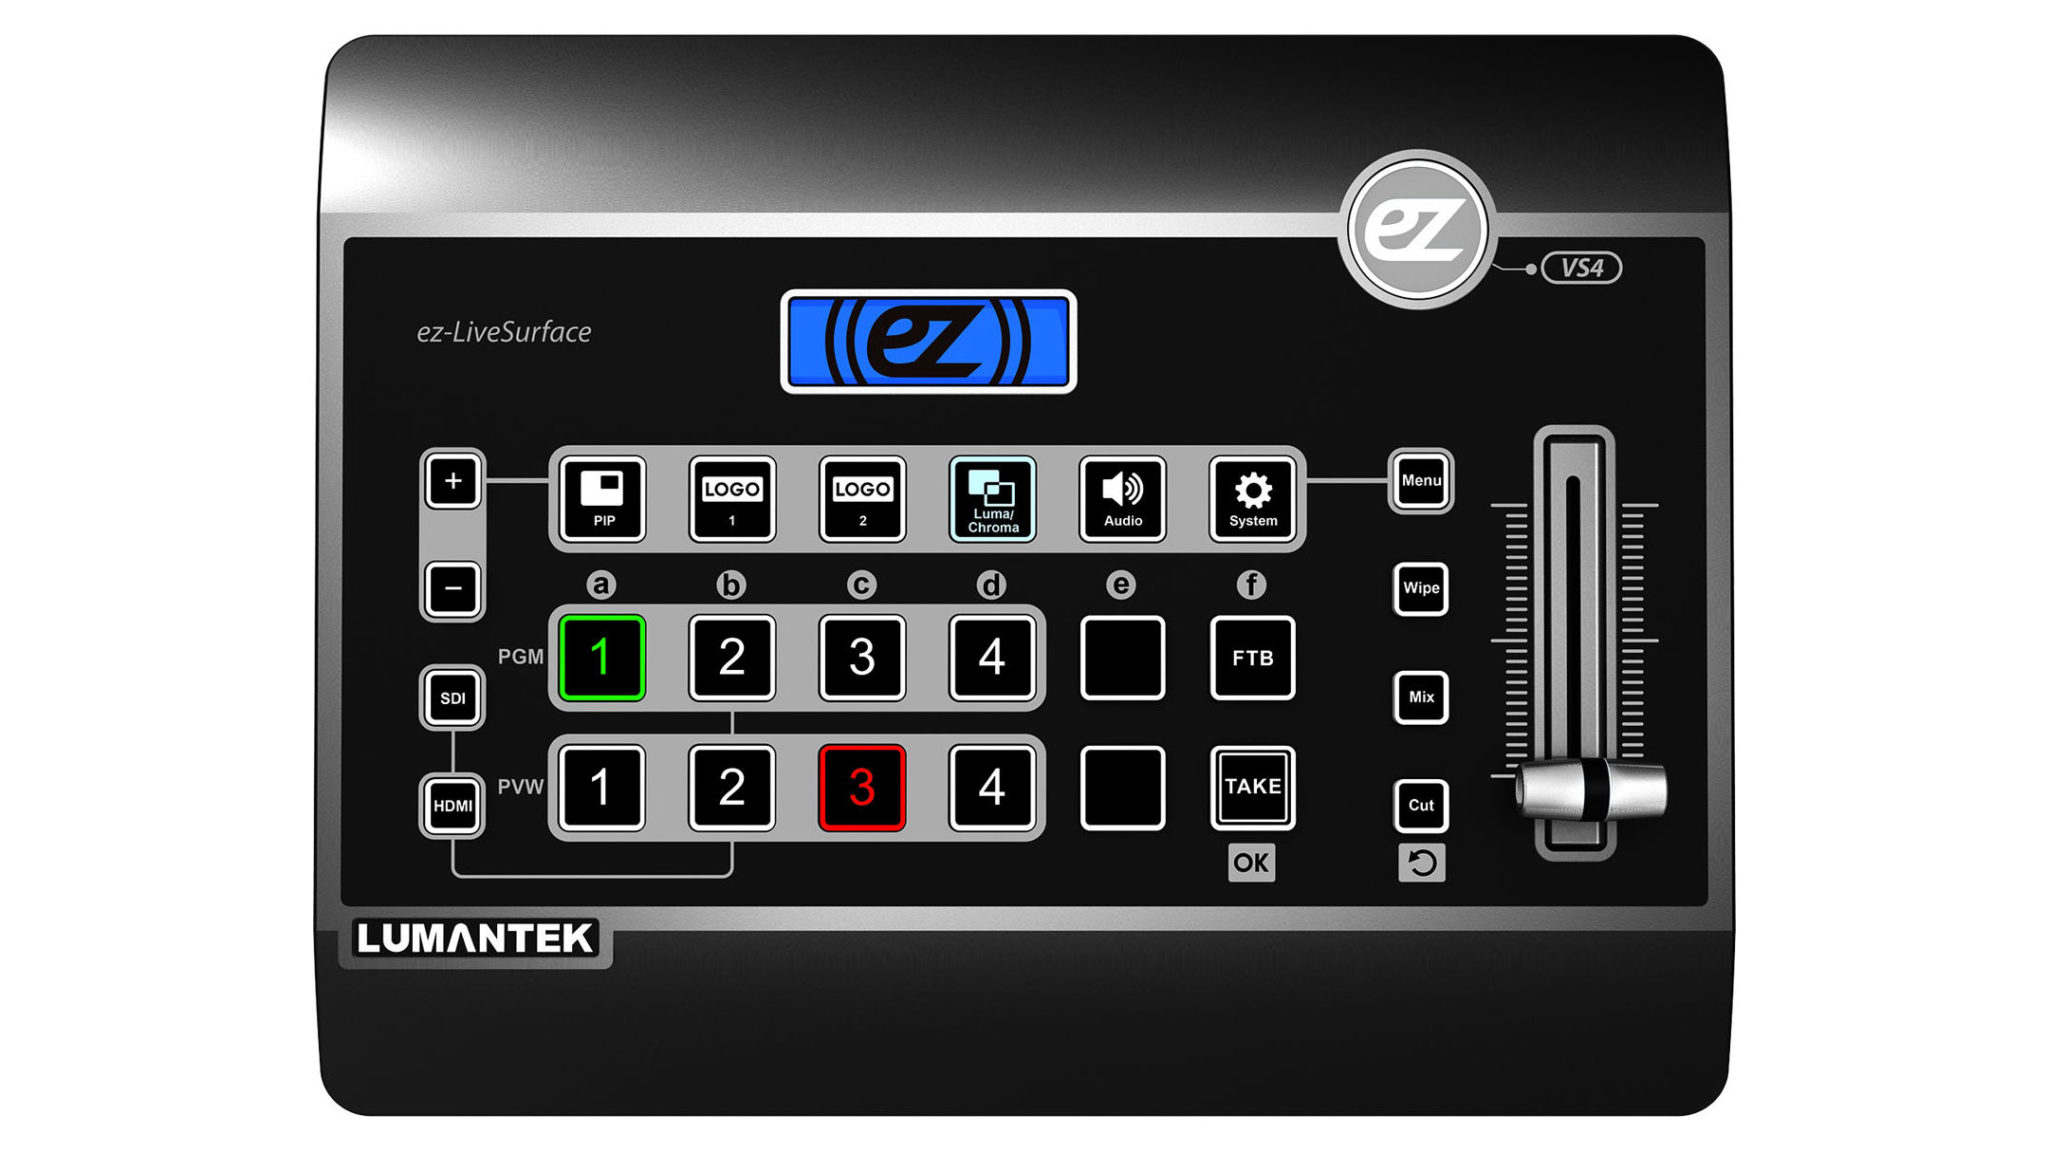
Out of the box, the ez-Pro VS4 looks extremely simple to use. It almost looks like a toy, but make no mistake — this is a pro unit with three rows of large buttons controlling various functions. You have two rows of six buttons each, four of them representing inputs, as well as fade-to-black and take functions. Another row above has buttons controlling the audio menu and other functions, including luma/chroma, picture-in-picture, and two logo buttons for overlays. At the very top of the console, a small LCD screen displays menu items, audio levels, and resolution and frame rate for each input. A T-bar is provided for manual effects control, with buttons just to the left of it that allow you to choose between cuts, mixes (dissolves) and wipes.

Back panel of the ez-Pro VS4.
Lumantek/product operating manual
The back of the unit has all of the inputs and outputs. It has an HDMI “multiview” that displays all inputs. Next to it are HDMI and HD-SDI outputs that are both active at the same time. I usually use one output to feed projectors and the other for recording. One of the four inputs is HD-SDI only, and two more are HDMI only, but one input has both HD-SDI and HDMI connections. Buttons on the far left of the console allow you to choose one of the connectors, so there are no menus to go through to make the switch. That means you can have both connectors hooked up to sources and cut between them — but not with transitions. A micro USB 2.0 connector lets you hook up a laptop and load logos into the frame-buffers, using the included software that’s provided for that job. There are also left and right 1/4-inch audio jacks for an independent audio source. The only other connector is for the DC power supply.
I found it very intuitive to use. I only needed the manual to learn how to load logos into the frame-buffers and a couple of other functions. For most of my switching I could have easily gotten through the job without reading it.
One interesting feature are the two logo buffers, each with its own button. The buffers are not full screen, maxing out at 512 x 512. Once you load a logo graphic into the buffer from your computer (via the micro USB 2.0 connector), you can use the switcher’s controls to place the logo where you want it on the screen. When you hit either the Logo 1 or Logo 2 button, the graphic will key over whatever you have on program out. If you switch inputs, the logo will stay up while switching until you hit the Logo button again. With most switchers you need to go through a fairly long process that isn’t quite practical in most AV set-ups to do a live key. These buttons make keying logos effortless.

The ez-Pro VS4’s HDMI multiview layout.
Lumantek/operating manual
I used the switcher at a couple of conferences. I was using a stationary camera to get what was happening on stage, a second camera for reaction shots, and a Mac and PC for playback and Powerpoint presentations. Cameras are generally an easy set-up. My camera operators and I have standardized around Sony’s older but trusty HVR-s270 and HVR-Z7 cameras for easy camera matching and their 1080i output. With the few Blackmagic Design switchers we use, we have had issues with the switchers accepting HDMI output from the Z7s. (We often found HDCP copyright protection would block the camera signal in the switcher. The problem was solved with no-name HDMI to HD-SDI converters, as the HD-SDI signal doesn’t support HDCP.)
Hooking up video output from computers, especially Macs, was a huge challenge. It required getting the frame size and frame rate all the same. You were sometimes able to get away with using 29.97 fps and 30 fps, but don’t try mixing 23.94 and 29.97. I made a cheat sheet for setting up computers with the BMD switchers and still spent a half hour to an hour getting everything in the same frame rate and size. This is where the Lumantek ez-Pro VS-4 earns the “ez” in its name. We set the output to 1080i and 29.97fps and plugged in the sources and, no matter what size or frame rate was coming in, it was converted to 1080i 29.97 fps. While we hadn’t tried standard definition, we frequently had 720p60 coming out of the Macs, and it upscaled beautifully. The Windows notebooks, which output 1080p59.98, also easily converted to 1080i30. I was thinking about getting a couple of Decimator MD-HX bidirectional HDMI–HD-SDI converters, but since the VS4-EZ basically has the equivalent of four of them built in, I didn’t need them. With that easy set up process, the longest chore now is laying cable.

The Lumantek ez-Pro VS4 on location.
Marc Franklin
The latest production we did with the ez-Pro VS4 was an awards dinner for a local synagogue that is the spiritual home to a number of Hollywood producers and writers. Our plan was to have the S270 on input 1 (HD-SDI). Input 2 was the receiver for our IDX CW-1 HDMI wireless system on the Z7 that was roaming the audience. We had a Mac doing a couple video playbacks in input 3, and input 4 went unused. We used HD-SDI to feed the projectors, and the HDMI out recorded into a Blackmagic Video Assist for recording a mix.
When you are recording the switched show and need the audio recorded, you have to set up the switcher’s internal audio mixer. I found that it is best to use the audio from just one audio source, so I used the audio from camera one. (Setting up the audio is a bit clunky during a show, so set it up before you go live.) To do the mix, hit the audio button. Next you hit the source you want to adjust. Then you use the “plus” and “minus” keys to adjust the level. When you get it where you like it, hit the “take” button. If you forget to hit take, you will need to do it over. After you adjust the source, you must adjust the output level. The default of the output is -100 db, so it can take some effort to get it up where you want it.
Once the show was on, I really noticed how much easier it was using an actual console with buttons rather than clicking on a virtual console on a notebook screen using a mouse and keyboard interface. With the console, you do not have to worry about accidentally hitting the wrong input. If the button is lit red, that input is live. If it is green, it is coming up next when you hit ‘take” or the input button directly on the program bus. This allows you to switch with a lot more confidence.
The ez-Pro VS4 has a number of other capabilities that I didn’t need, including wipes, picture-in-picture, and chromakey. I’d say 97% of switching is dissolves or cuts. Those other features I tend to need more in post, not in live production — but it’s nice to know I could do them live if I needed to.
With so much to like about the ezPro VS4, is there a catch? There are a few things that could be worked on, but nothing that is a dealbreaker. The buffers for storing the logos have a maximum frame size of 512 x 512. The thinking over at Lumantek is that it would be used for logos and bugs for live broadcast. But in the AV world, we like to have a full-frame 1920×1080-capable buffer for full screen logos. This is something we missed from the Blackmagic switchers. We compensated by loading the client graphic onto one of our playback devices and feeding it through an HDMI input. That’s not a big deal, but having it in an internal buffer would be a lot more convenient. Our contacts at Lumantek said they are looking into whether it’s possible to make full-frame buffers a software upgrade.
The other thing that bugs me a bit is that, while the switcher holds some settings in memory between uses, the audio record out always returns to -100 db. A couple of times I forgot to turn it up before we rolled. I have backup audio from the in-camera recordings, but it would be nice if that setting held.
Those concerns aside, I really liked working with the Lumantek ez-Pro VS4. The interface was really nicely laid out and intuitive to use. It reminded me a bit of the prosumer Videonics MX-1 switcher that I used from the mid 1990s until around 2010 when I got the Blackmagic Design ATEM Television Studio. The MX-1 was a great, small, intuitive package and was pretty popular in the AV world where you needed good quality. The ez-Pro VS4 could easily become the next go-to switcher for the AV industry. The video output was very clean, the buttons were very responsive, and the scaler feature on each input made it quick to set up. From the way members of my AV tech team reacted to using it, I think they will be buying their own in the near future.
I highly recommend the Lumantek ez-Pro VS4 for any live switching job where you don’t need more than four inputs. I don’t think you will find another switcher that will give you this kind of quality and capability for the money. While ideally I’d like another couple inputs, the ez-Pro VS4 is my new first choice for switching live shows. It looks like Blackmagic Design has some new competition in the small switcher market.


